Partly Procurements Update
Everything you need to know about the recent changes to the Orders page, and an introduction to Procurements.
What's Changed? — The Orders Page
The Orders page is now split into three areas:
- Procurements — the master list of every request and order. This is your home base and your view is completely customisable.
- Shipments — items you've dispatched or are due to dispatch.
- Claims — returns and disputes against confirmed orders. (just a foundation for now)
Follow the guide below to learn about the new changes in these three areas and how they all work.
The Procurements Page
A closer look at the Procurements table — your inbox for everything coming from repairers.
You can search, filter, sort and adjust the columns shown to view the right information at the right time.
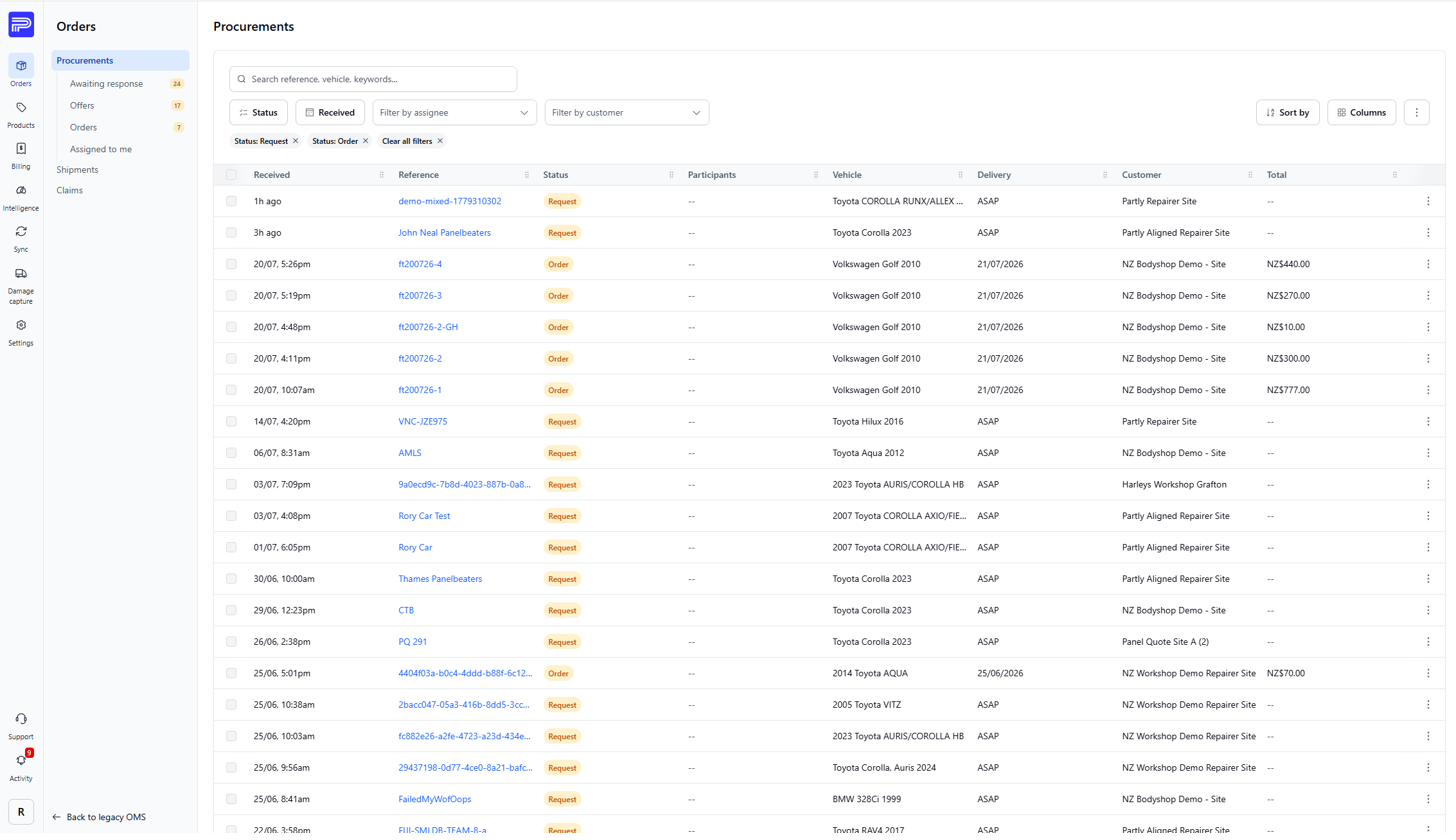
Search
Search has gotten smarter! You can now search by reference, vehicle, keywords and part numbers.
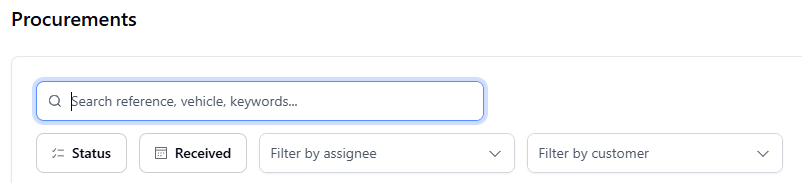
One procurement, five statuses
In the past, requests and orders were separate things. They're now unified into a single procurement that moves through a lifecycle — its status tells you which stage it has reached, and whose turn it is to act.
Request → Responded → Order → Confirmed → Closed
| Status | Meaning |
|---|---|
| Request | A repairer has asked for parts and is waiting for your offer. |
| Responded | You've sent your offer; the repairer is reviewing it. |
| Order | The repairer has placed an order from your offer. |
| Confirmed | The order is locked in and ready to fulfil. |
| Closed | The procurement is finished or was closed off. |
Filter by status
Open Status and tick any combination of Request, Responded, Order, Confirmed or Closed. Each choice you tick becomes a removable chip under the bar. The saved shortcuts in the navigation — Awaiting response, Offers, Orders and Assigned to me — are just pre-filtered status views, each with a live count badge.
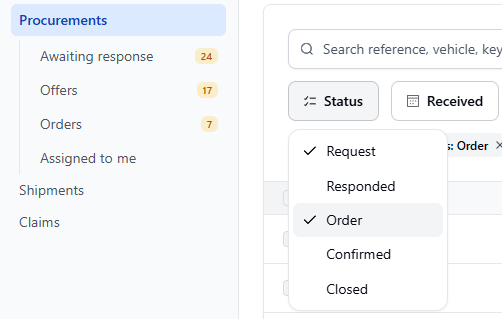
Filter by date, assignee or customer
Open Received and choose a range type — Before, After or Between — then set the date(s); handy for “everything from this week” or clearing a backlog. Use Filter by assignee to see only jobs owned by a particular teammate, and Filter by customer to focus on one repairer site — start typing to search either list.
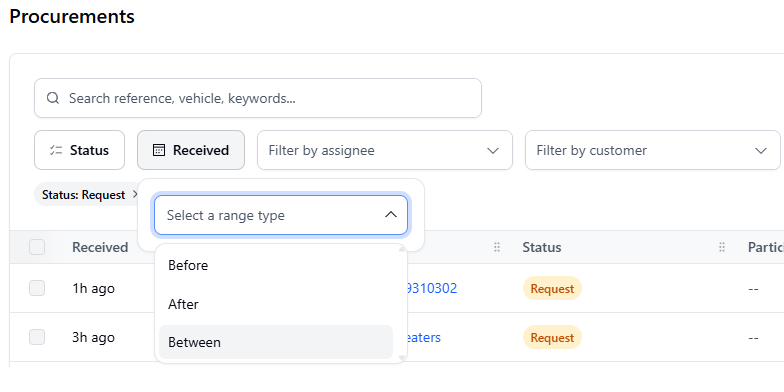
Every active filter shows as a chip. Remove one with its ✕, or use Clear all filters to reset the whole view at once.
Sort and shape the columns
Use Sort by to reorder the list. Use Columns to select which columns you want visible and which you don't — you can change this at any time, or reset to default. You can also drag columns into any order to arrange them however works best for you.
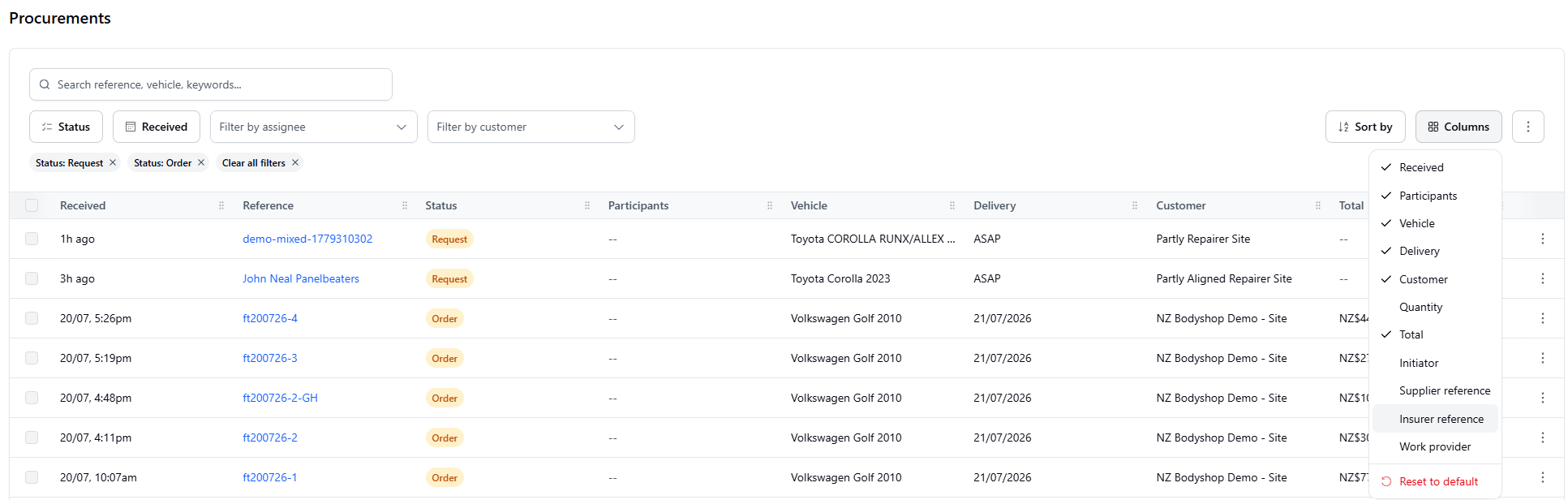
Filters, sorting and column choices are remembered per person, not per organisation. Set the list up the way you like it and it'll be there next time — without changing anyone else's view.
What each column means
| Column | What it tells you |
|---|---|
| Received | When the request arrived (e.g. “1h ago”, or a date/time). |
| Reference | The shared reference for the job — click it to open the procurement. |
| Status | Where the job is in its lifecycle (see below). |
| Participants | People watching or assigned to the job. |
| Vehicle | The make, model and year the parts are for. |
| Delivery | The requested delivery date, or “ASAP”. |
| Customer | The repairer site the request came from. |
| Total | The current value of your offer or the order. |
| Quantity | The total number of parts in the procurement. |
| Initiator | Who started the request. |
| Supplier reference | Your own quote or invoice reference for the job. |
| Insurer reference | The insurer's claim or reference number. |
| Work provider | The party managing the repair work behind the request. |
Acting on several rows at once
Tick the checkboxes on the left of multiple rows to act on them together. You can bulk-close requests you're not going to fulfil — with or without a note — and assign jobs to yourself straight from the list.
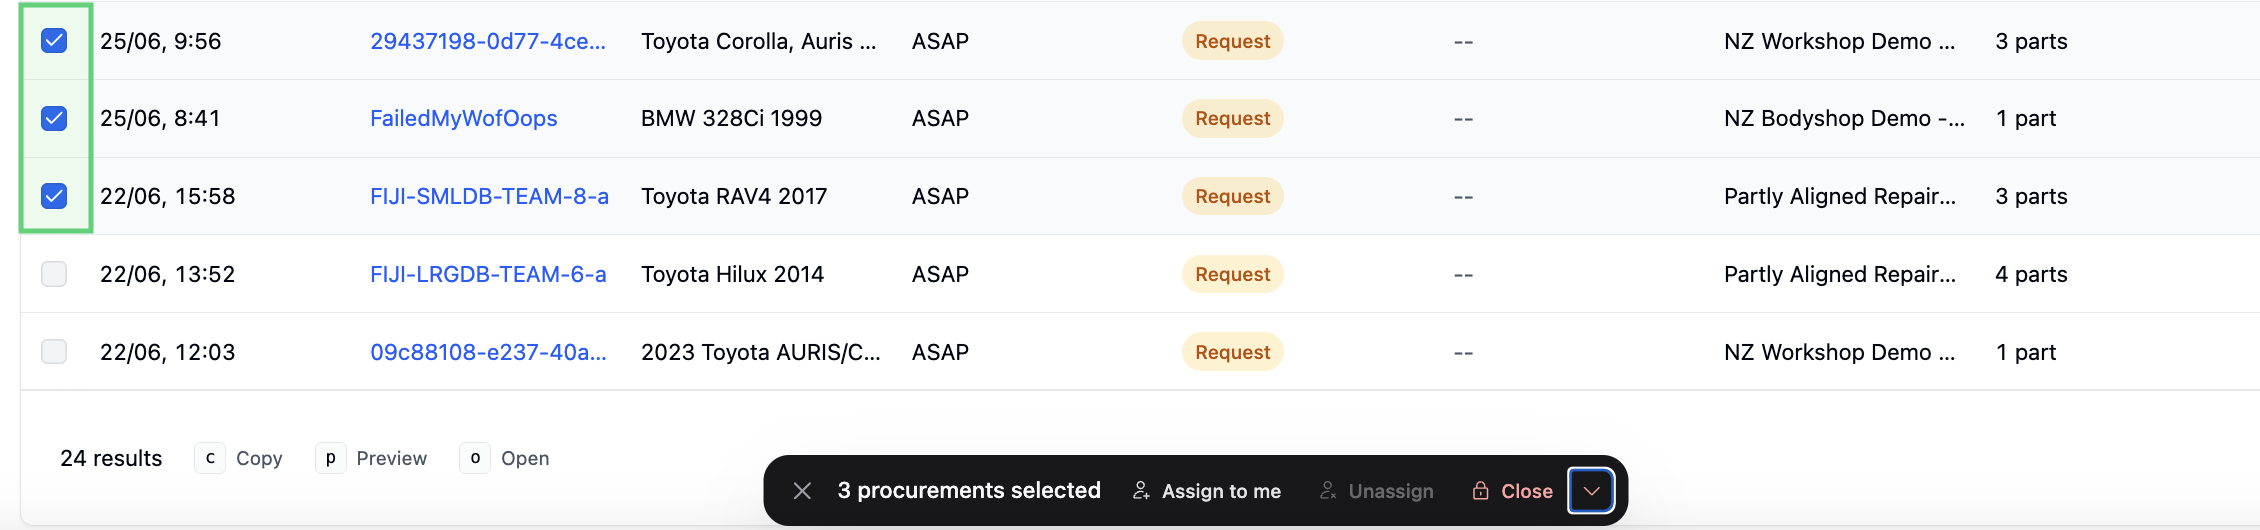
Previously you'd decline a request or cancel an order. Those are now a single action — Close — and anything closed moves to the Closed status, whether it started as a request or an order.
Keyboard shortcuts
Move between the cells of the table with your arrow keys, then press a shortcut on the focused cell:
←↑↓→— move between cellsC— copy the cellP— preview the procurementO— open the procurement
Inside a procurement
Click a reference to open the procurement. This is where you'll spend most of your time — reading what the repairer needs, then building your response.
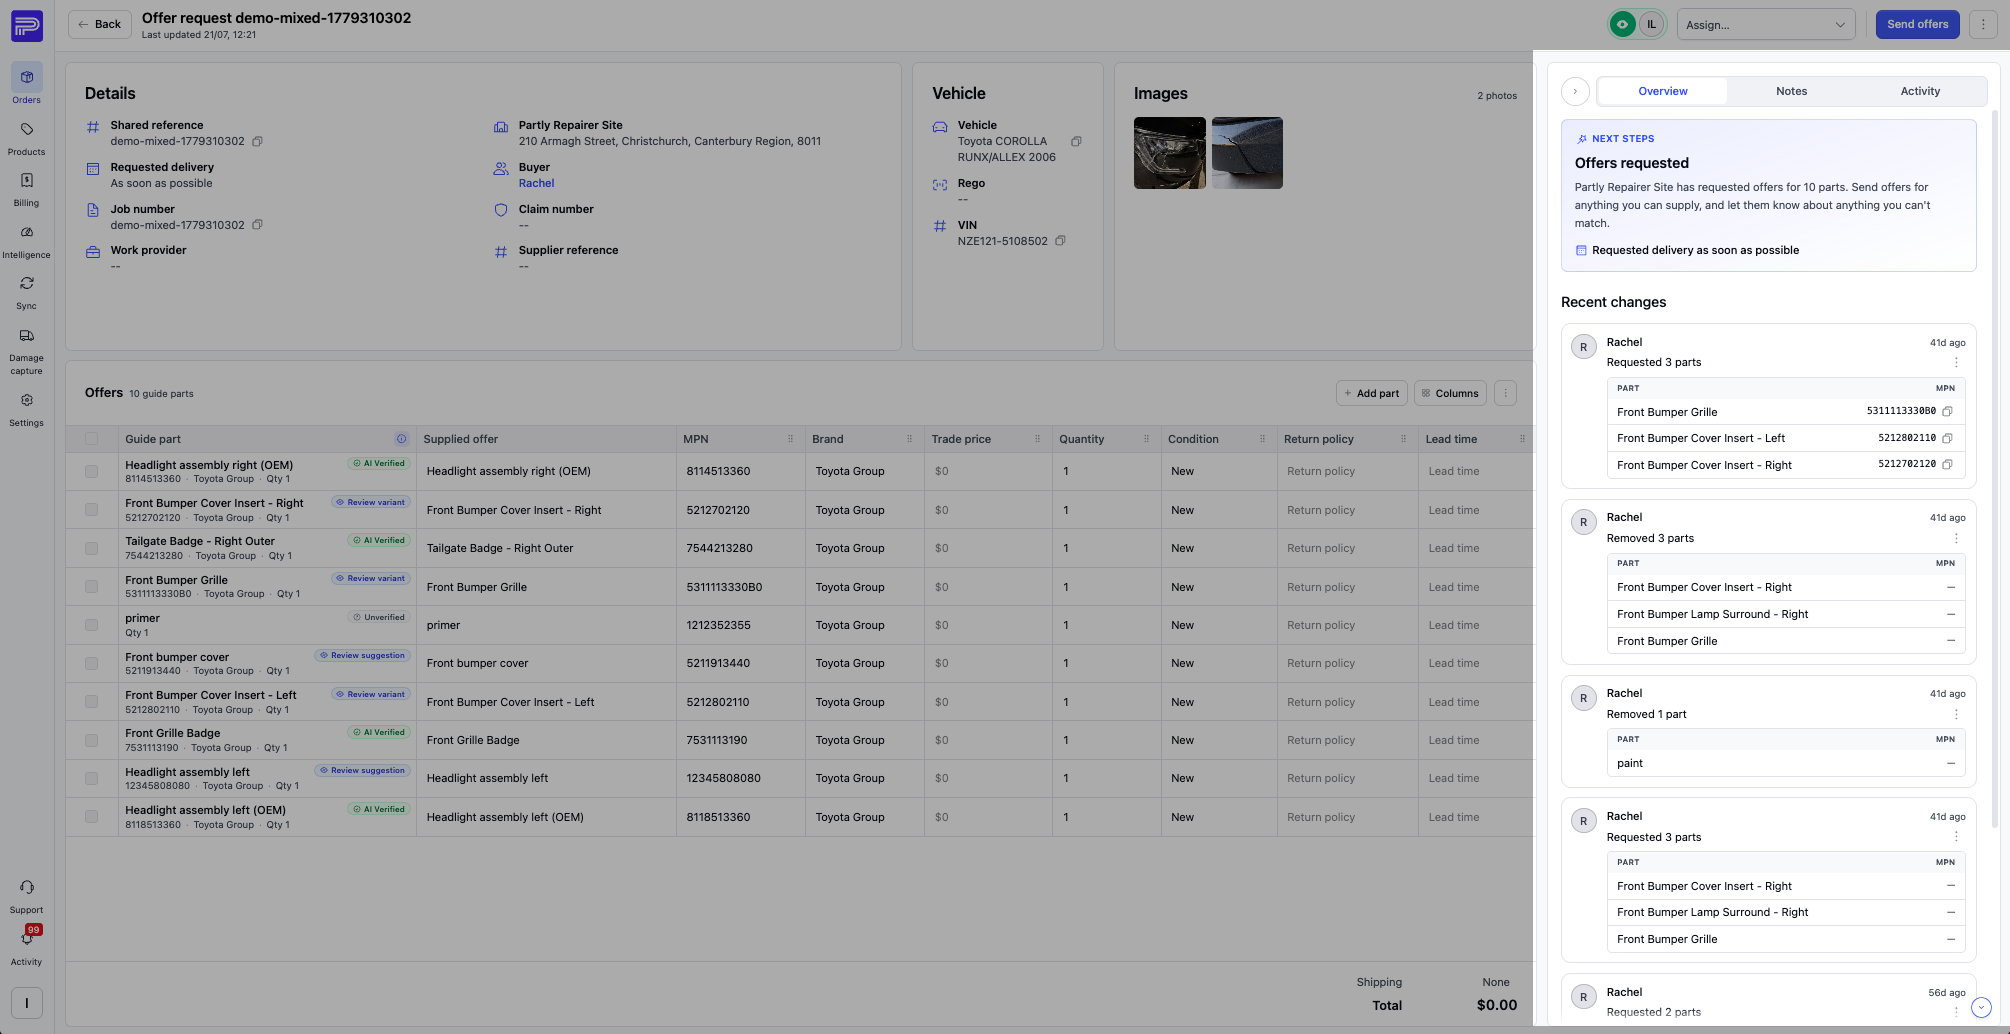
A procurement is laid out in four areas: the header along the top, the information panels (Details, Vehicle and Images), the side panel on the right, and the parts list below. Resize the panels by clicking and dragging the divider between them, so you can give more room to whatever you're working on. We'll go through each area in turn.
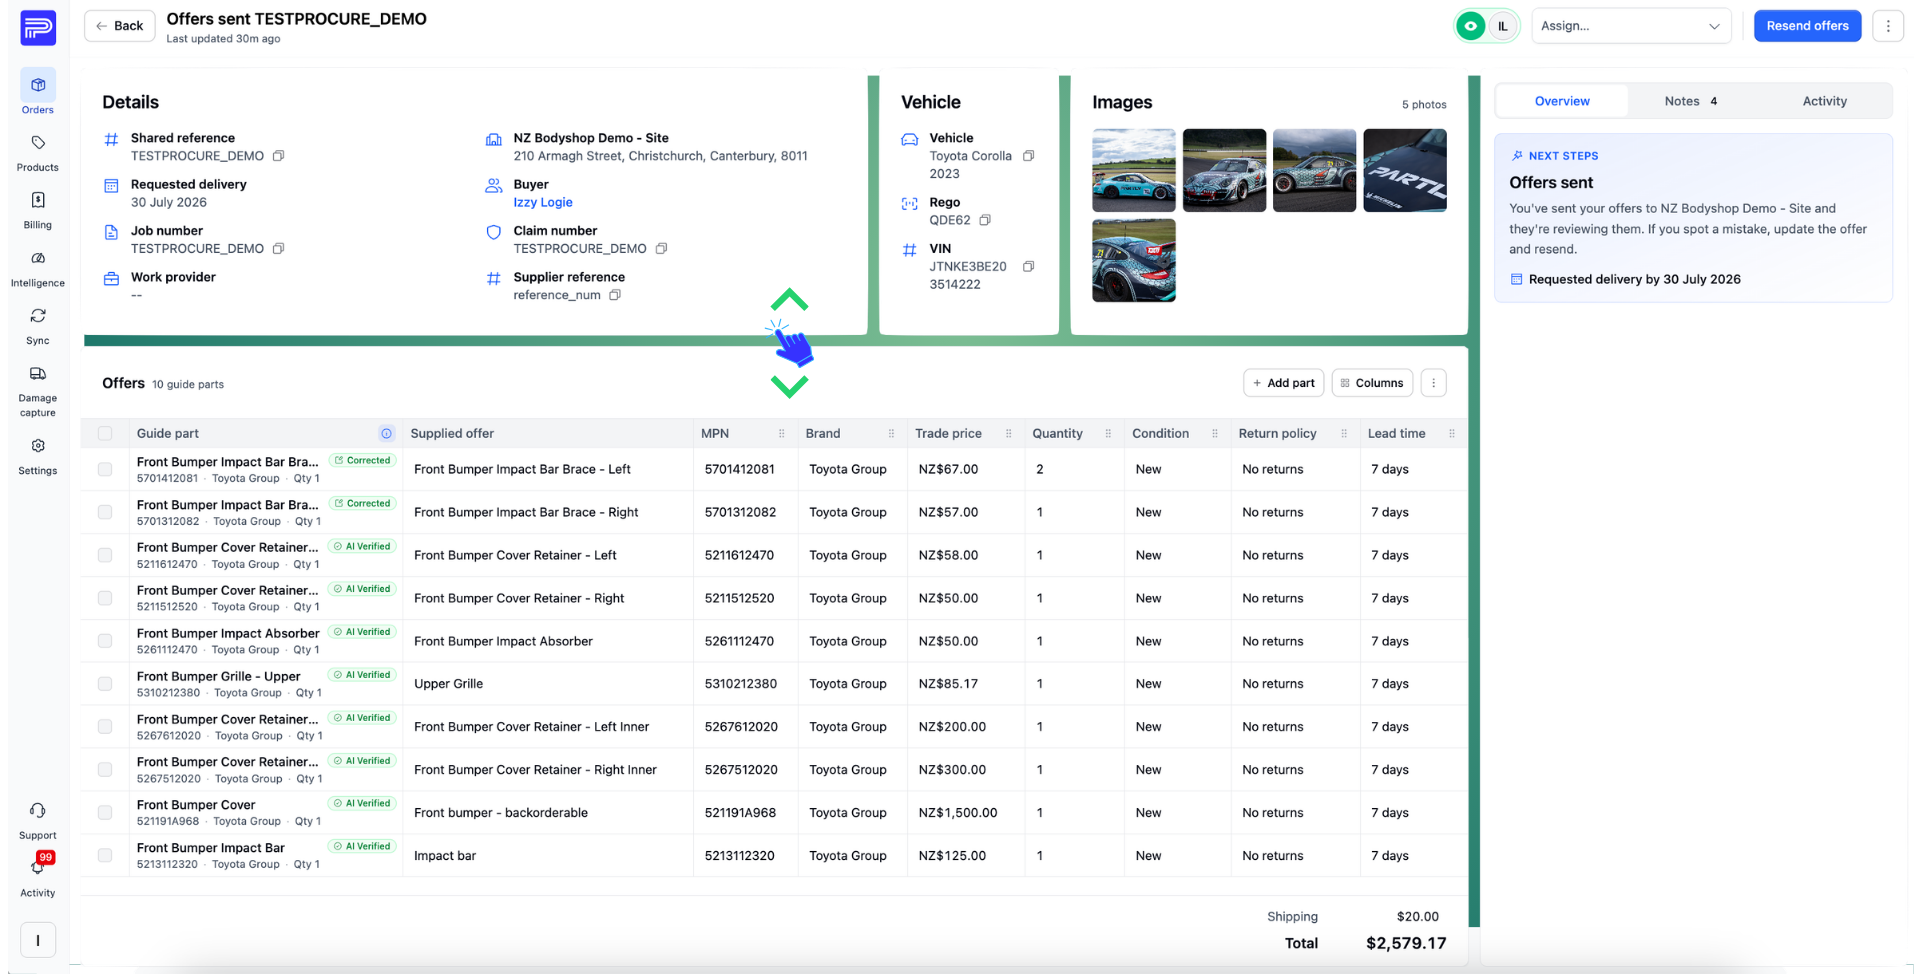
3.1 The Header
Across the top you'll find Back to return to the list, the procurement title and reference, when it was last updated, the Watch and Assign controls (covered just below), the blue Send offers button (below), and a ⋮ actions menu for extra tools (below).

Viewing & assigning
Watch
The eye toggle beside the avatars shows who is viewing the procurement, and turns orange when more than one person is viewing at once.
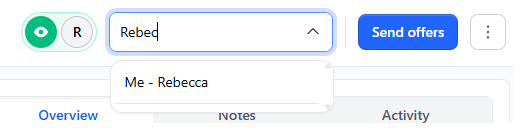
Assign
Use the Assign box to make someone the owner of the job. Start typing a name and pick them from the list.
Sending & closing
Click the blue Send offers button in the header. Your offer goes to the repairer for review, and the job's status becomes Responded.
To decline a procurement, click the ⋮ menu and choose Close — the procurement moves to Closed.
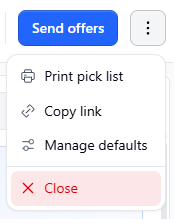
Printing & managing defaults
The header's ⋮ menu holds the rest of the tools:
- Print pick list — a warehouse-friendly list of the parts to pick.
- Copy link — a shareable link to this procurement.
- Manage defaults — set your standard terms (see below).
- Close — close the procurement without offering.
Managing defaults. You don't have to set condition, return policy and lead time on every offer, every time. Set them once as defaults and new offers start pre-filled — then change them whenever you need to, either as your standing default or just for the job in front of you.
Open the header's ⋮ menu and choose Manage defaults.
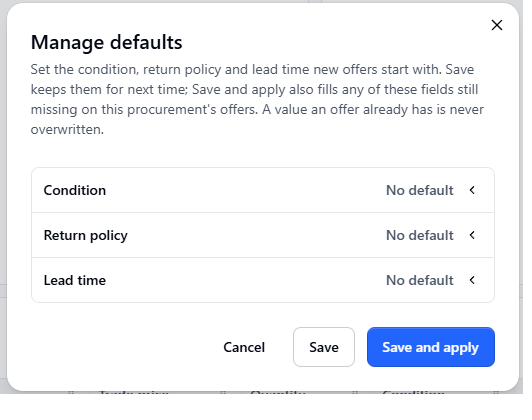
Set it once and forget it, or tweak it on a single job: because Save and apply never overwrites an existing value, changing a line by hand always wins over the default.
3.2 The information panels
The Details, Vehicle and Images panels hold the same information as before: the job's references and requested delivery, the vehicle (with copy buttons for the rego and VIN), and the repairer's damage photos.
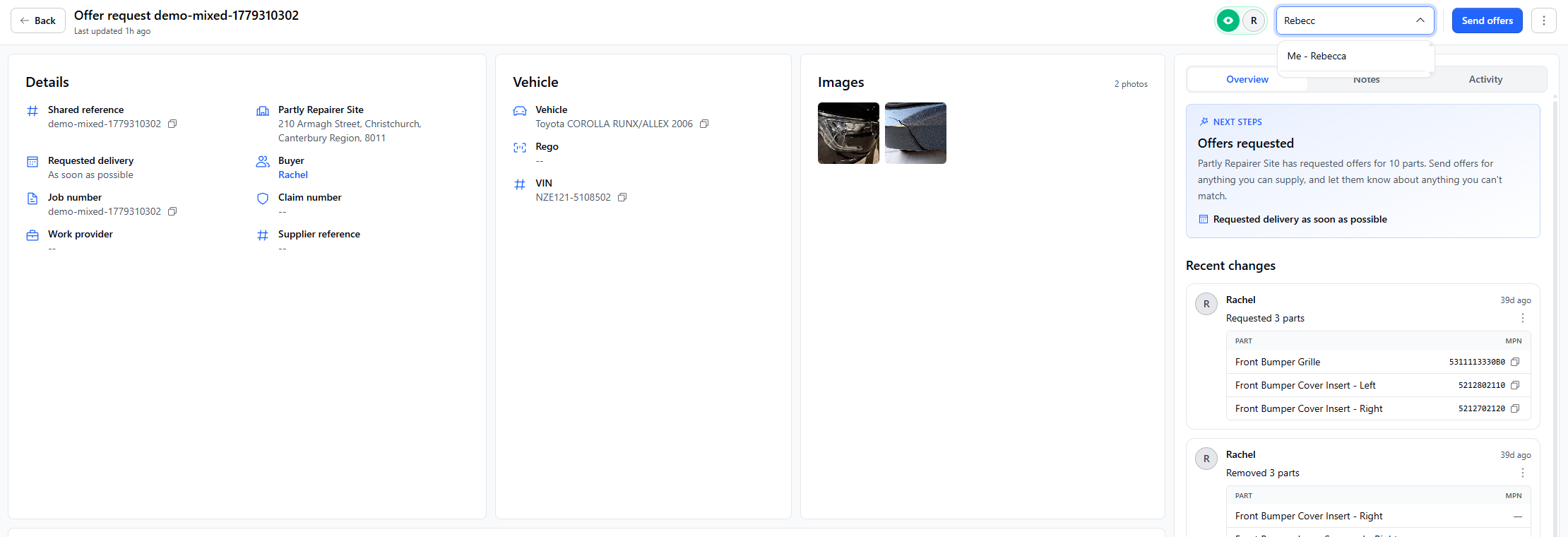
The Supplier reference field now sits in the Details panel. Use it for your own quote numbers, WIPs and any internal reference you want tied to the procurement.
3.3 The side panel
The right-hand side panel is one of the biggest changes. It stays with you as you work and changes what it shows depending on what you're focused on — the whole procurement, or a single part. You can collapse it any time using the arrow in the top-left corner of the panel.
Procurement view
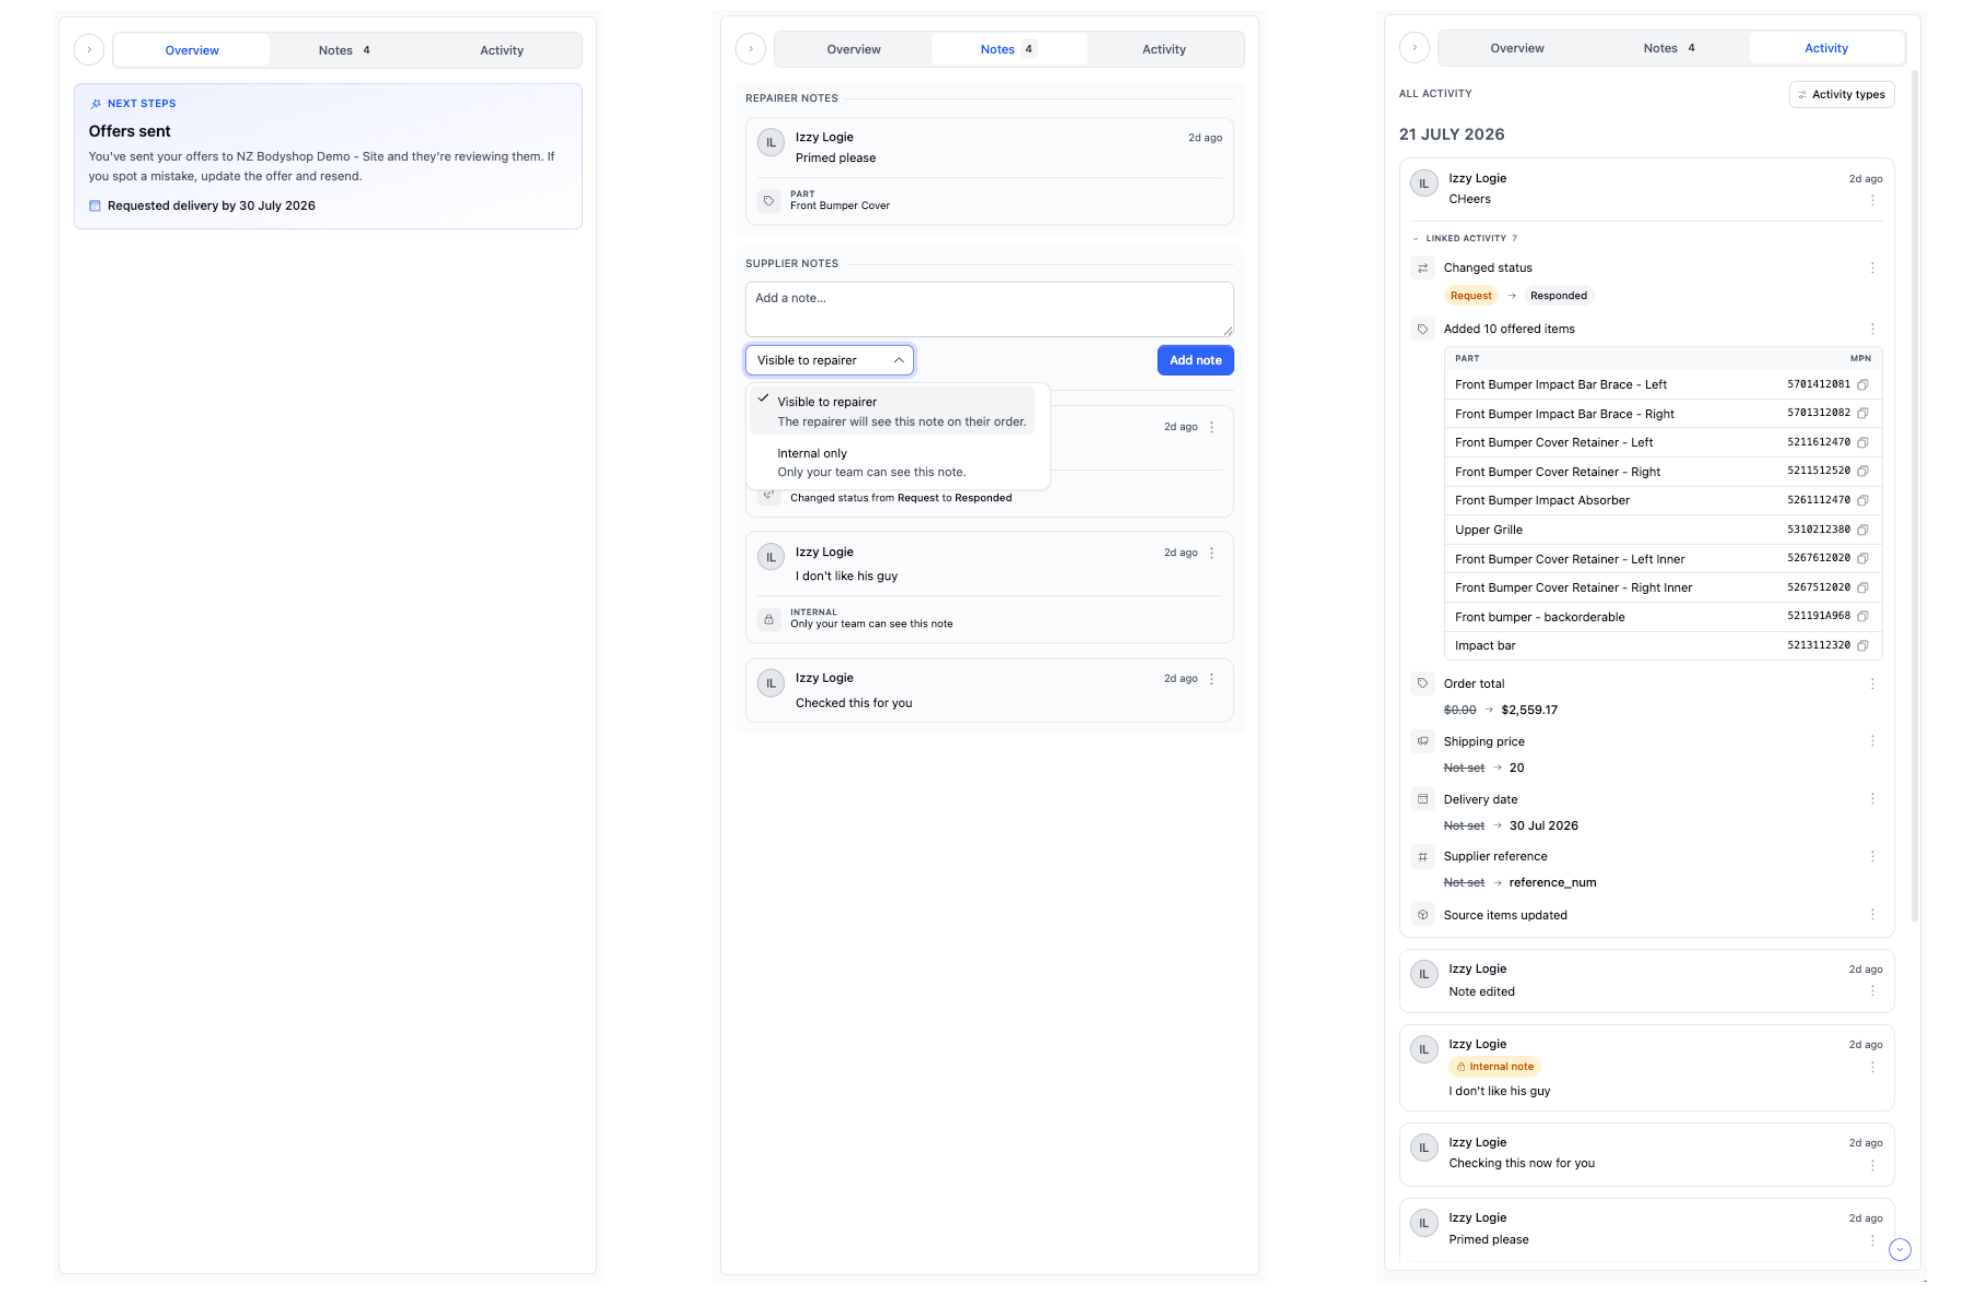
With no part selected, the side panel covers the whole procurement across three tabs:
- Overview — recent changes at a glance, any related supplementary procurements, and whether the repairer has added or removed anything.
- Notes — every note for this procurement lives here. You can now also write internal-only notes, and edit notes even after they've been sent.
- Activity — the full history of every change.
Part view
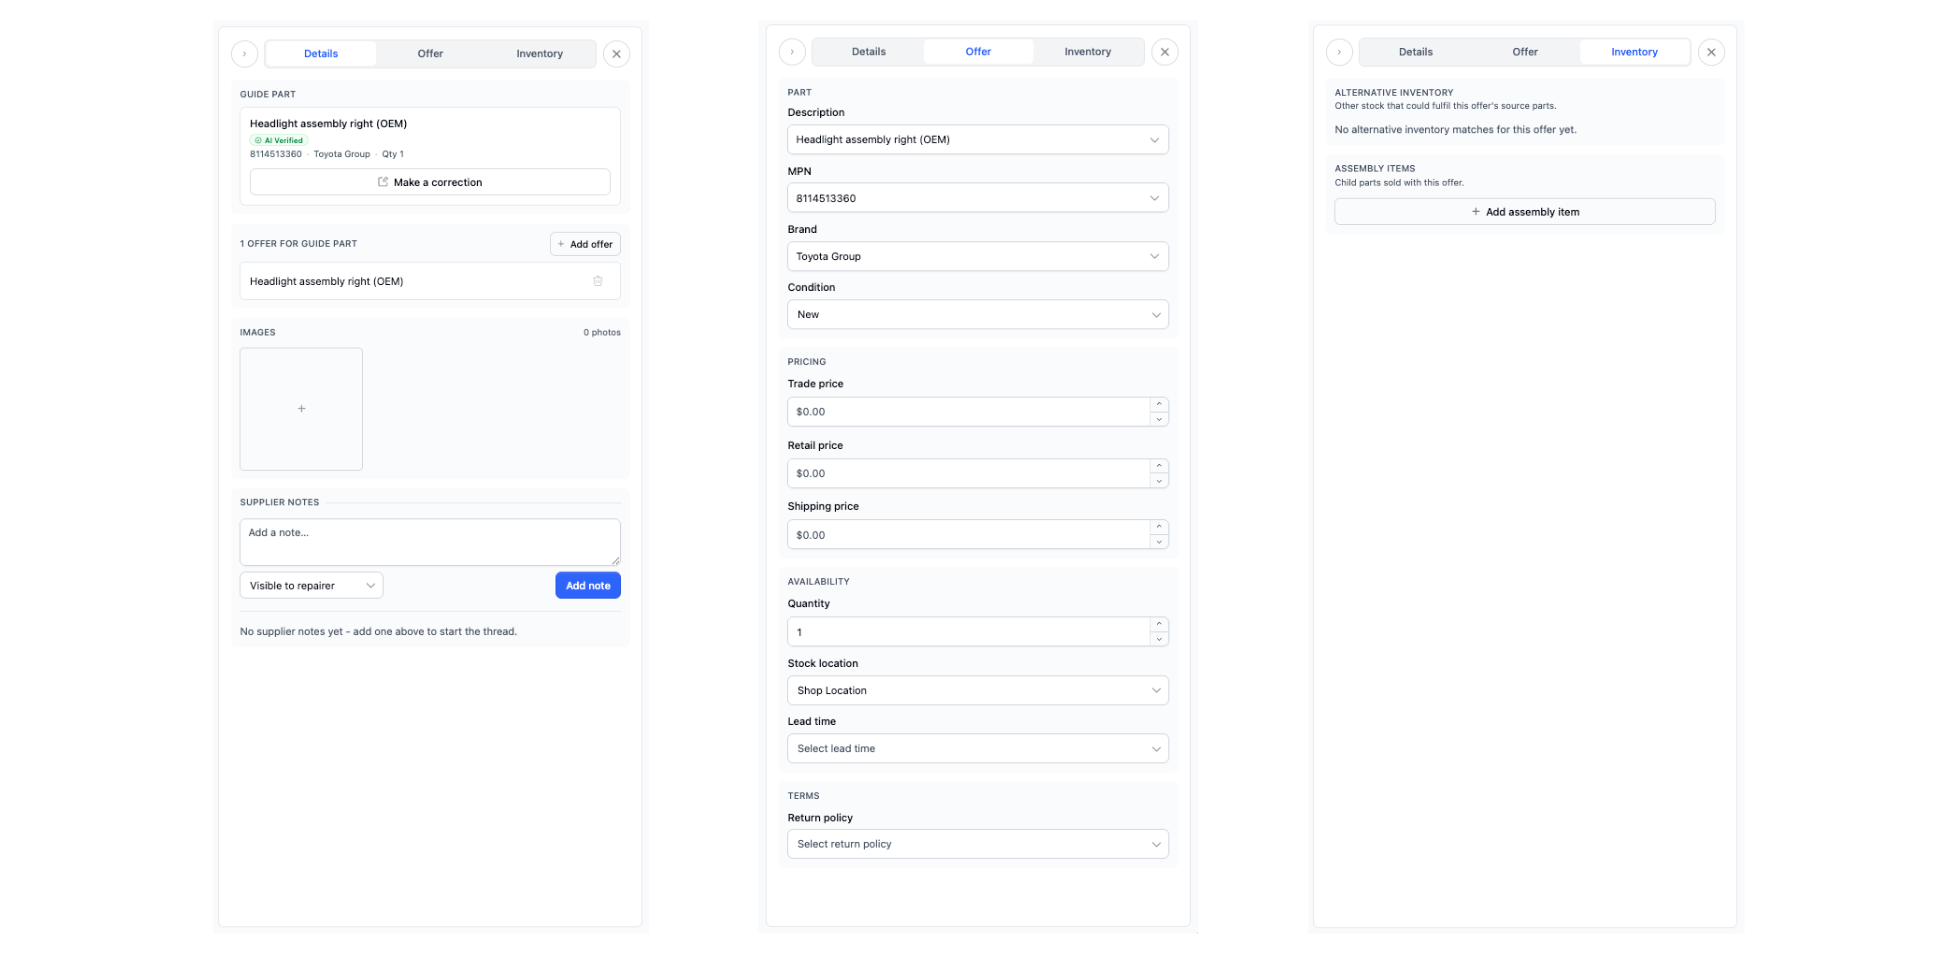
When you click on a part in the parts list, the side panel switches to show additional information about that part and your offer for it. Three tabs cover it:
- Details — information about the guide part and the ability to correct it if it's wrong. This is also where you can add images and notes to that part offer.
- Offer — all information about the part you're supplying; not just what's in the table.
- Inventory — alternative stock that could fulfil the part, and any assembly (child) items sold with the offer.
3.4 The parts list
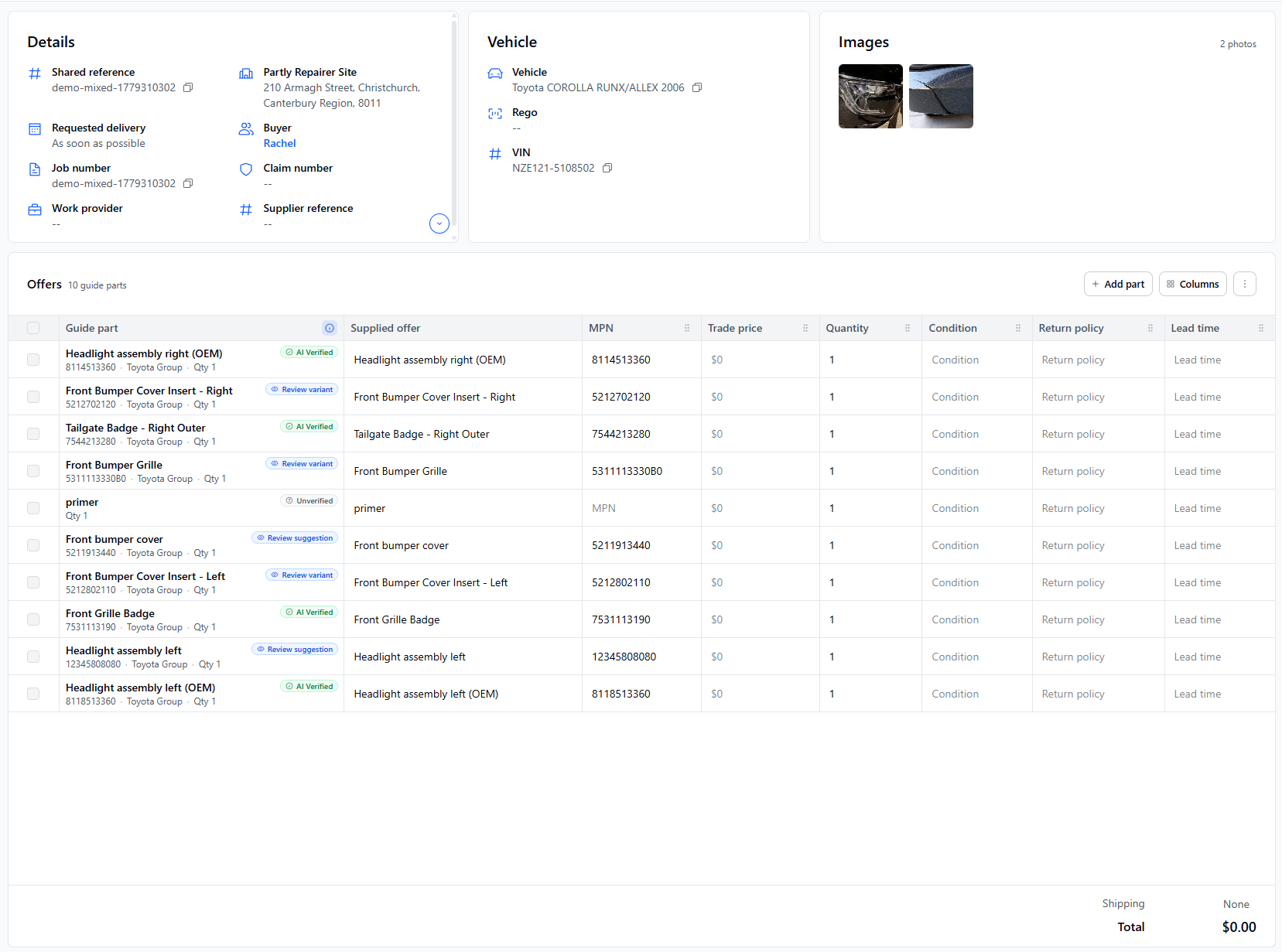
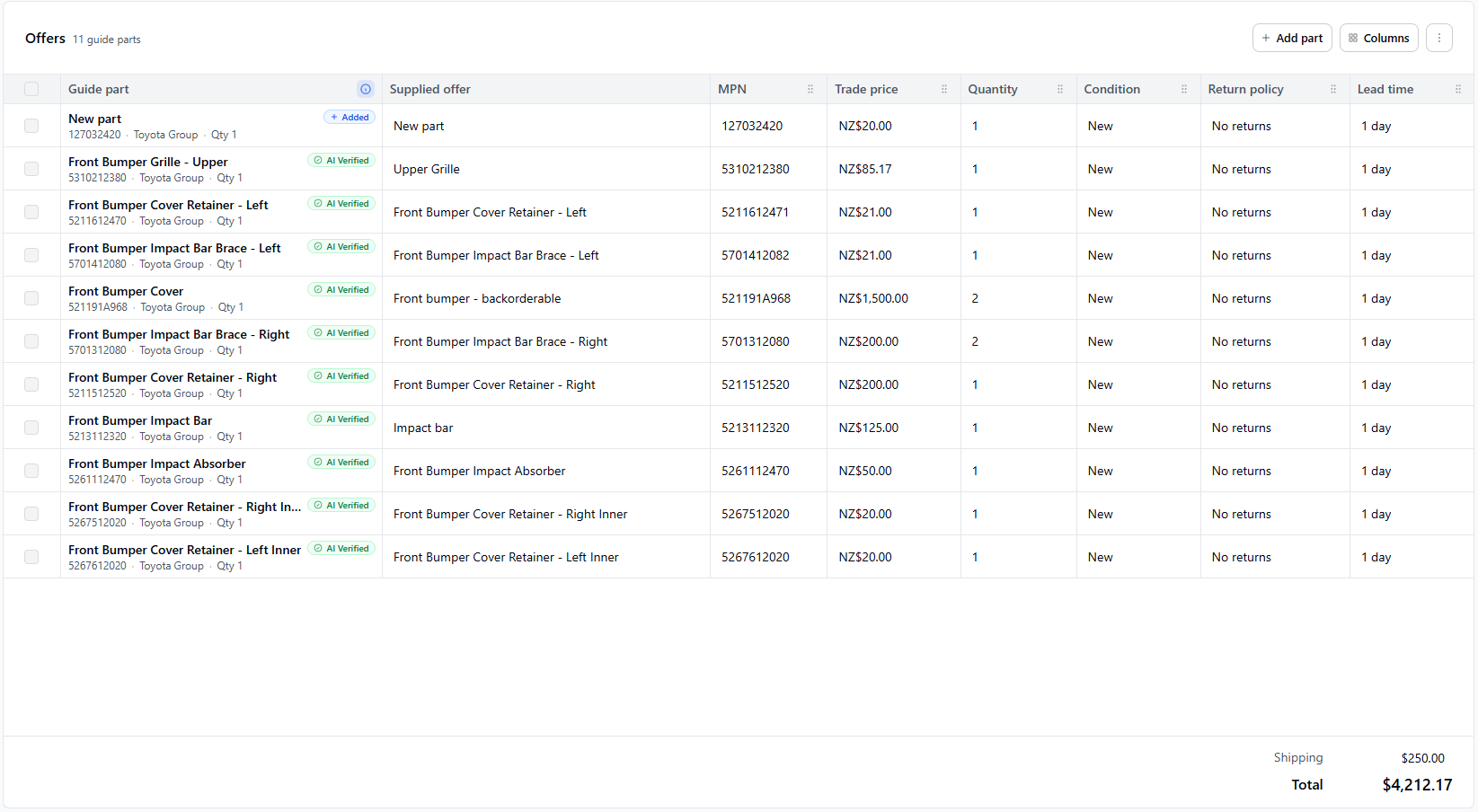
The offers table is the heart of a response. Each row pairs a part the repairer asked for (the guide part) with what you're offering to supply, its price and its terms.
Reading a row
- Guide part — what the repairer requested, with its part number, brand and quantity.
- Supplied offer — the part you'll actually supply against it (can differ from the guide part).
- MPN — the manufacturer part number of your offer. It's pre-filled with the guide part number where one is available, but you can change it if you need.
- Trade price, Quantity, Condition, Return policy, Lead time — your terms for that line.
Shaping the table
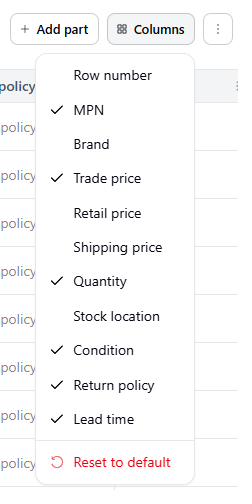
Use Columns to show extra fields such as Brand, Retail price, Shipping price, Stock location or a Row number, and hide what you don't need.
Real jobs don't always match the request exactly. You can add parts the buyer forgot, correct a mis-identified part, remove what you can't supply, and dig into a single line in the side panel.
Verification badges
Partly checks how confident it is that the matched part is correct, and labels each guide part:
| Badge | What it means |
|---|---|
| AI Verified | Confidently matched — usually safe to price as-is. |
| Review variant | A variant may differ — check it against the photos. |
| Review suggestion | A suggested match worth a quick confirm. |
| Unverified | Not matched to a catalogue part — verify before pricing. |
Filling in your offer
Fill in your offer right in the table. You can click straight between cells to edit them, or use your keyboard to move around quickly — handy when you're working through a long list.
With the keyboard, the table has two modes:
- Navigation mode — use your arrow keys
←↑↓→to move between cells straight away. - Editing mode — press
Enterto edit the focused cell. From there, pressTabto save and move across to the next cell, orEscto stop editing and go back to navigating anywhere with the arrow keys.
Two options that beat filling each cell:
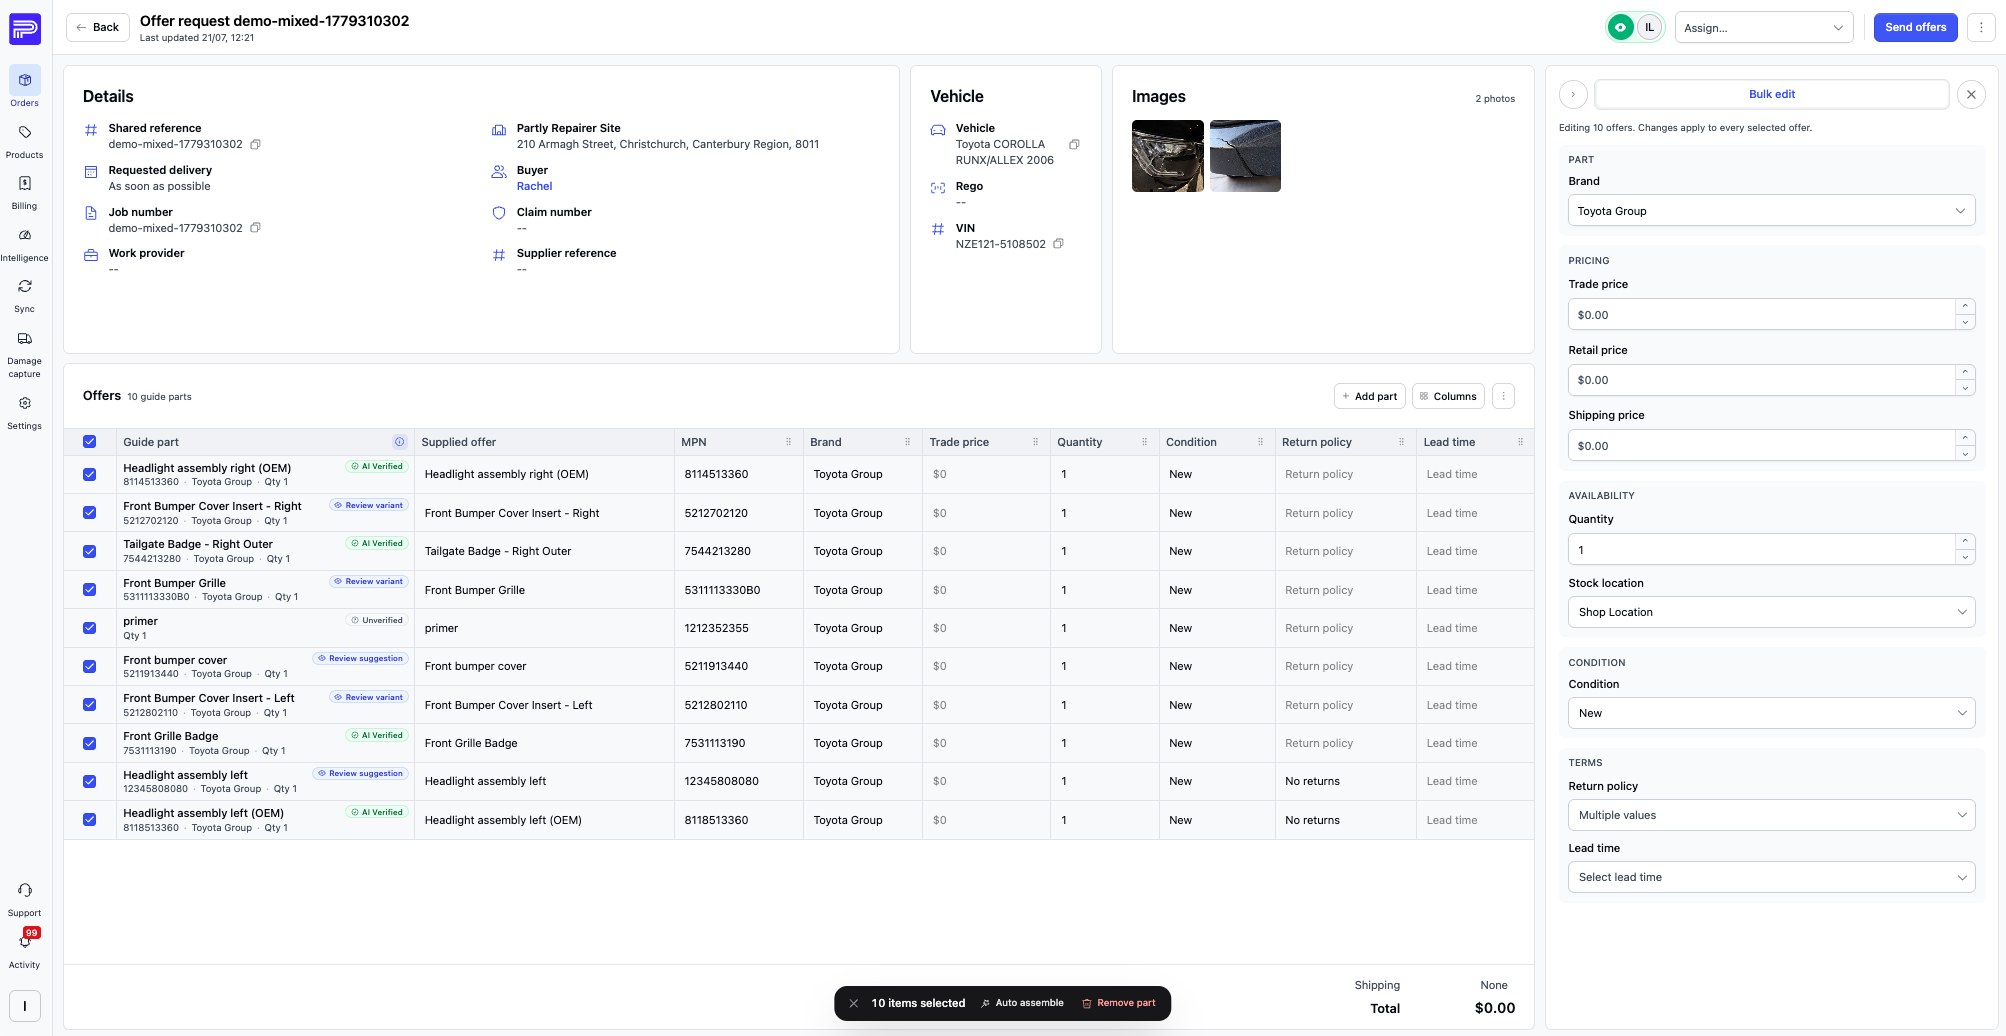
Manage defaults — set a standard condition, return policy and lead time once, and new offers start pre-filled.
Bulk edit — tick the checkboxes at the front of the lines you want (or the top-left checkbox to select them all), then set the value once in the side panel and it applies to every selected line.
Add a part
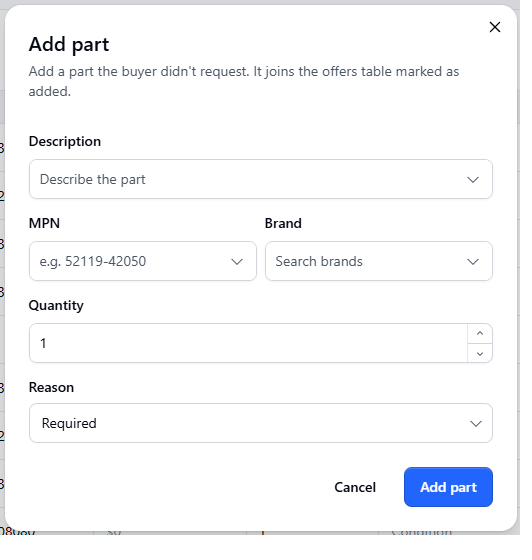
Need to offer something the repairer didn't request — a consumable, an extra fixing, a substitute? Use + Add part.
- Click + Add part above the table.
- Enter a Description, the MPN, the Brand and a Quantity.
- Choose a Reason, then Add part.
Remove what you can't supply
If you can't fulfil a line, select it and choose Remove part. Removed parts disappear from the table.

When you can't supply a part, remove it from the request rather than setting its quantity to 0. Removing makes it unambiguous to the repairer that the part isn't being offered.
Orders & confirmation
When a repairer places an order, the procurement changes status from Responded to Order. As before, confirm the order as soon as possible to lock it in.
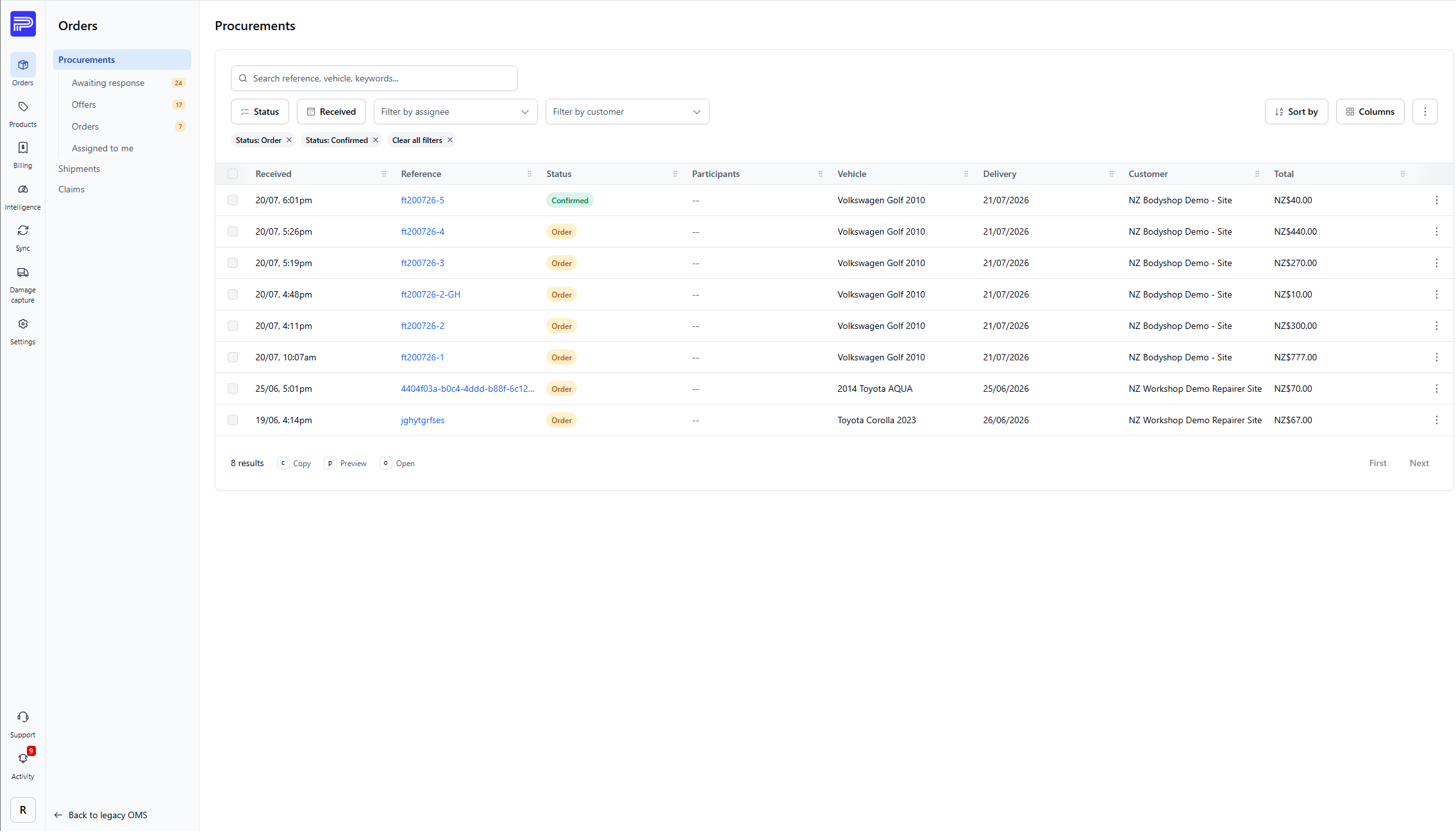
If a repairer doesn't order all the parts, the side panel tells you which part(s) they've removed.
Dispatching
Dispatching now has a dedicated space — head to the 06 Shipments section to learn how this now works.
Returns
Returns work the same as the previous system — select the checkbox in front of the parts being returned. The only change is that the Mark returned button now sits in the popup at the bottom.

Editing & Resending
Spotted a mistake after sending, or need to adjust a price? You can now edit a procurement in any stage, then resend it to the repairer.
- Make your changes in the offers table.
- Click Resend offers in the header.
Shipments
When an order is confirmed, a shipment is created — giving you a dedicated space to track and dispatch the orders that need to go out to your customers.
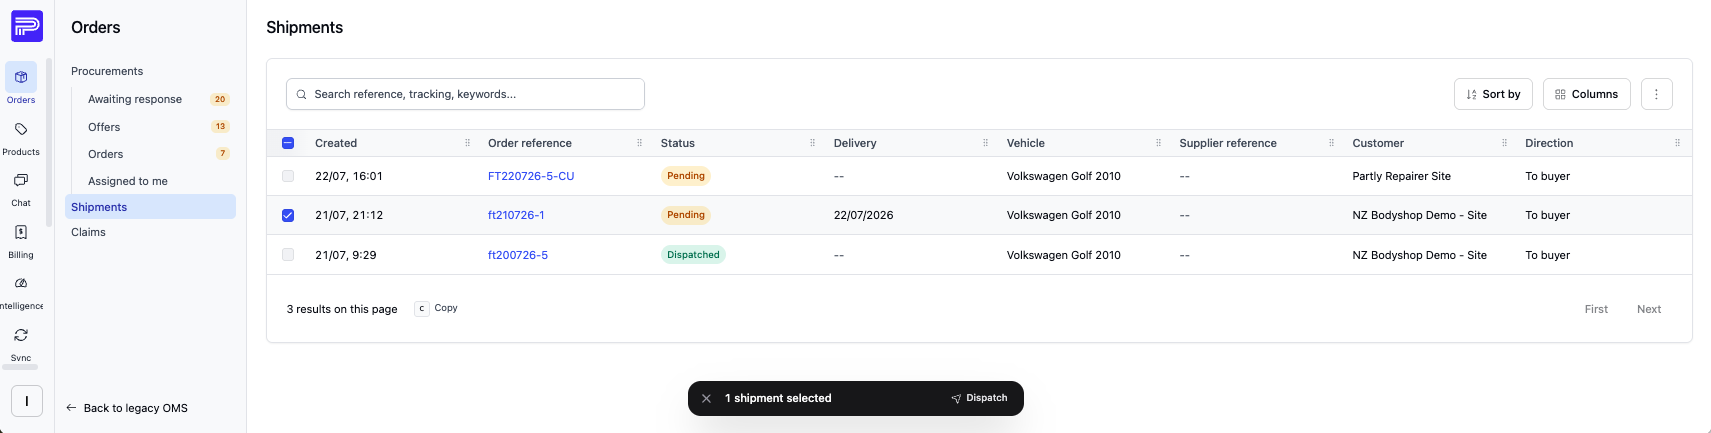
To dispatch a shipment, tick the checkbox in front of it, then click Dispatch in the popup at the bottom.
Claims & returns
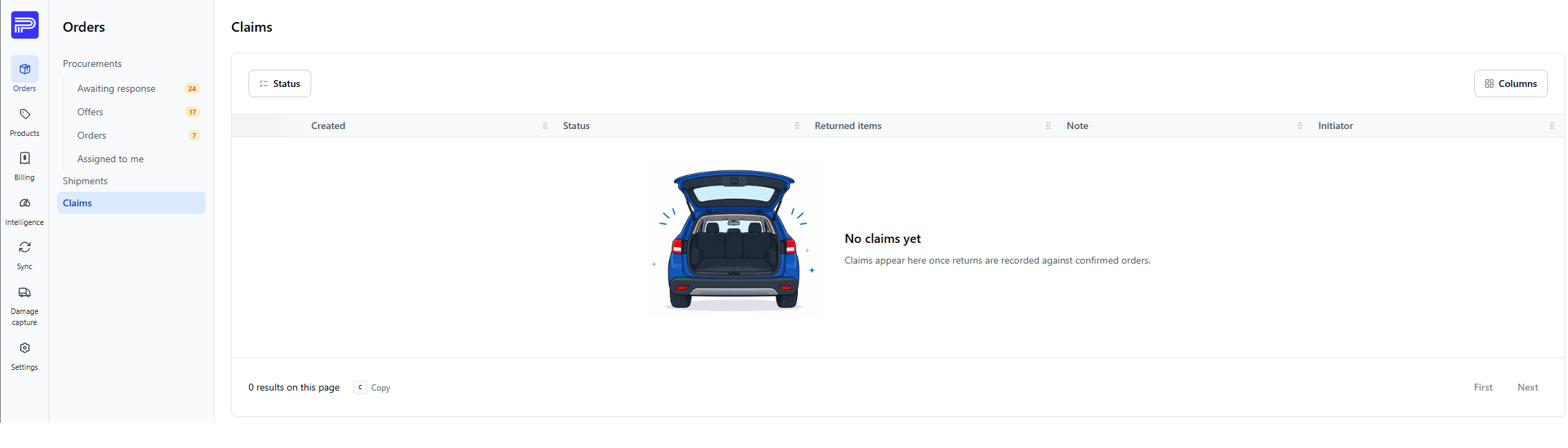
The Claims area is where returns and disputes against confirmed orders will live.
For now, all returns still have to be processed within the order itself. The Claims area lays the groundwork for handling returns and disputes here in a future update.
Exporting
There are a few different ways to export information out of Partly — the parts list on a procurement, the shipments list, and the full procurements list.
Exporting the parts list
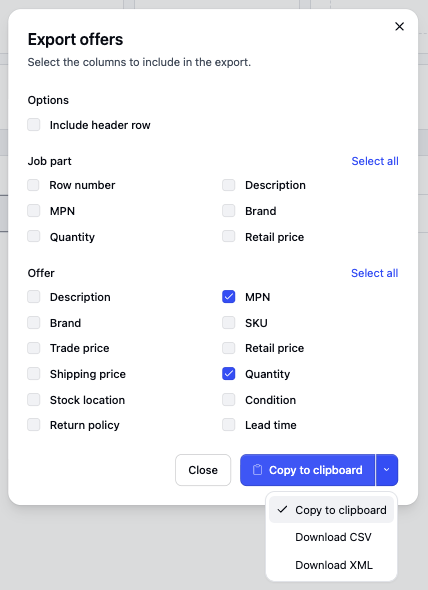
You can now export part or all of the parts list — click the ⋮ (three-dot) menu and choose Export, or use the shortcut Ctrl+E.
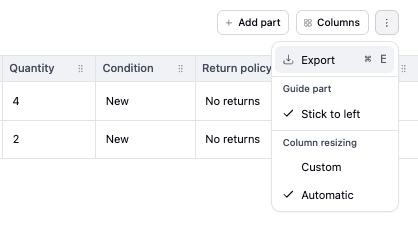
Select all — or as many columns as you want — then choose to copy them to your clipboard, or download as CSV or XML.
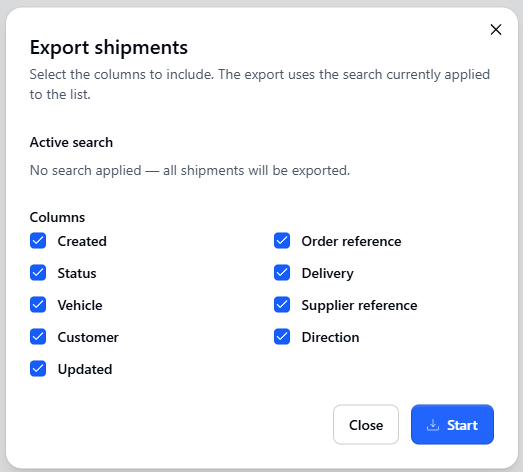
Exporting shipments
The ⋮ menu has an Export action that downloads the shipments list as a CSV file.

- Open ⋮ › Export.
- Tick the columns to include.
- Click Start to download the CSV.
Exporting the procurements list
The ⋮ (three-dot) button at the top right of the list holds two actions: Hide automated responses to declutter the view, and Export to download the list.

- Apply any filters you want first — the export uses the filters currently on the list.
- Open ⋮ › Export.
- Tick the properties you want to include.
- Click Start to download the CSV.
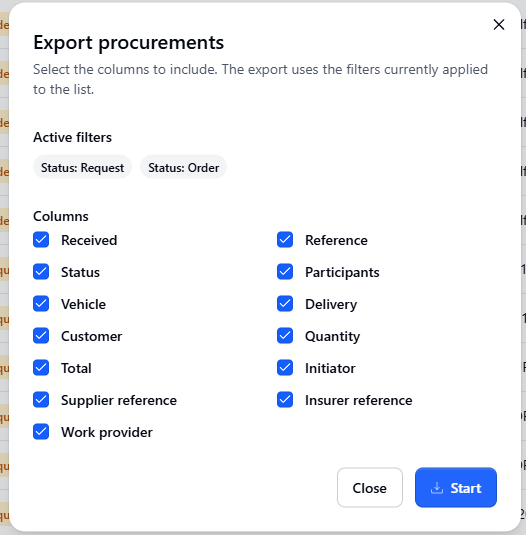
Only the rows matching your current filters are exported. To export everything, clear all filters first.
Quick reference
The essentials in one place — bookmark this section.
Status lifecycle
Request → Responded → Order → Confirmed → Closed
Keyboard shortcuts
| Key | Action |
|---|---|
← ↑ ↓ → | Move between cells in the table |
C | Copy the focused cell |
P | Preview the procurement |
O | Open the procurement |
Ctrl+E | Export the offers table |
Verification badges
| Badge | Do this |
|---|---|
| AI Verified | Price with confidence. |
| Review variant | Check the variant against the photos. |
| Review suggestion | Confirm the suggested match. |
| Unverified | Verify before pricing. |
Settled ways of working
- Can't supply a part? Remove it from the request — don't set the quantity to 0.
- After an order is Confirmed, only the delivery date is editable.
- Repairer-visible notes are sent when you submit your response — write them first.
- Set condition / return policy / lead time once as defaults; override per line any time.
- Your filters, sorting and columns are saved to you, not the whole organisation.
Glossary
| Term | Meaning |
|---|---|
| Guide part | The part the repairer requested (the reference for the line). |
| Supplied offer | The part you're actually offering against the guide part. |
| MPN | Manufacturer Part Number. |
| Assignee | The person who owns a procurement. |
| Watcher | Someone kept in the loop without owning the job. |
| Work provider | The party managing the repair work behind the request. |